


Did you know that electrical issues cause 55% of home accidents? That’s why understanding basic electrical wiring, such as 2-way switch wiring, is essential for homeowners and landlords. Not only can it help you troubleshoot common problems, but it also ensures safety and efficiency in your home’s electrical system.
What is a Two Way Switch?
A two-way switch lets you control a single light or a group of lights from two locations. This is particularly useful in large rooms, hallways, staircases, or areas with multiple entry points. For instance, you can turn on a light when entering a room and turn it off from another switch when exiting.
How Does 2 Way Switch Wiring Work?
Two way switch wiring involves two switches connected to the same light. The switches are wired so that flipping either switch changes the state of the light (on to off or off to on). Here’s a step-by-step guide on how two way light switch wiring works:
- Identify the Components: You need two switches, a light fixture, and wiring that includes live (hot), neutral, and ground wires.
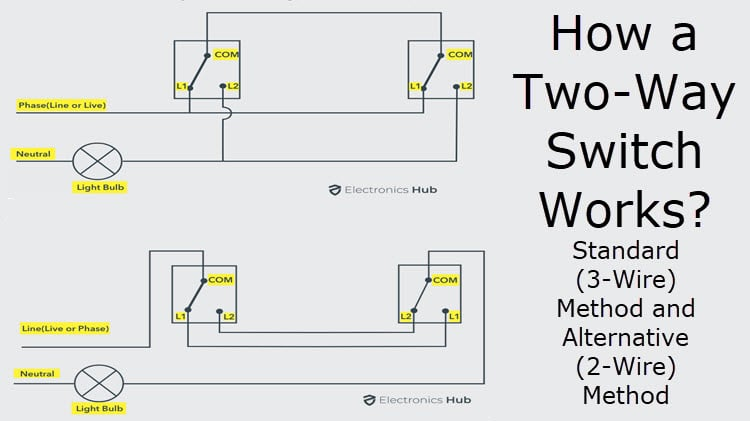
- Understand the Wiring Diagram: A 2 way light switch wiring diagram typically shows two switches connected by two traveler wires and one standard wire. The diagram will also show how these are connected to the light and the power source.
- Make the Connections: Connect the live wire from the power source to the common terminal of the first switch. Then, connect the two traveler wires between the traveler terminals of both switches. Finally, connect the common terminal of the second switch to the light, and connect the neutral wire to the power source.
Components of 2 Way Switch Wiring
To better understand two way switch wiring, it’s helpful to know the components involved:
- Switches: Standard single-pole double-throw (SPDT) switches are used for two-way switch systems.
- Traveler Wires: These wires connect the two switches and allow the current to flow between them.
- Standard Wire: This wire connects one of the switches to the light fixture.
- Light Fixture: The light is controlled by the switches.
- Power Source: Typically, a breaker panel provides the electrical current.
2 Way Light Switch Wiring Diagram
A 2 way light switch wiring diagram is a visual representation that helps understand how the switches and wires are connected. The diagram usually includes:
- Power Source: Indicating where the electricity comes from.
- Switches: Showing how each switch is connected to the traveler wires and standard wire.
- Light Fixture: Illustrating how the light is connected to the switches and the power source.
- Wire Connections: Detailing the path of the electrical current through the system.
Here’s a simple breakdown of a typical 2 way switch wiring diagram:
Why Use 2 Way Switch Wiring?
There are several reasons why two way switch wiring is advantageous:
- Convenience: Control a light from multiple locations, making it easier to manage lighting in large spaces.
- Safety: Reduce the risk of accidents by turning lights on and off from different points.
- Energy Efficiency: Prevent unnecessary energy usage by ensuring lights can be easily turned off from any location.
Pros and Cons of 2 Way Switch Wiring
Like any electrical solution, two way switch wiring has pros and cons. Understanding these can help you decide if it’s the right choice for your home or business.
Pros:
- Enhanced Control: Provides flexibility in controlling lighting from multiple locations.
- Increased Safety: It makes keeping areas well-lit easier, reducing the risk of trips and falls.
- Cost-Effective: Relatively inexpensive to install and can save money on energy bills over time.
Cons:
- Complex Installation: A complex switch system can be more complicated to install than a single switch system, requiring a good understanding of wiring diagrams and electrical principles.
- Potential for Errors: Mistakes in wiring can lead to malfunctioning switches or electrical hazards.
- Maintenance: If a problem occurs, troubleshooting can be more complex due to the additional components involved.
2 Way Switch Wiring Diagram Home Applications
Two-way switch systems are ideal for various home applications, such as:
- Staircases: You can turn on the light at the bottom and turn it off at the top.
- Hallways: Providing control from either end of the hallway.
- Large Rooms: Enabling light control from multiple entry points.
- Garages: Allowing you to operate lights from both inside the house and within the garage.
Tips For Installing 2 Way Switch Wiring
If you’re planning to install two-way switch wiring in your home, here are some tips to ensure a successful installation:
- Turn Off Power: Always turn off the power at the breaker before starting any electrical work.
- Use the Right Tools: Ensure you have the tools, including wire strippers, screwdrivers, and a voltage tester.
- Follow Diagrams: A reliable two-way switch wiring diagram guides your installation.
- Check Connections: Double-check all connections to ensure they are secure and correctly placed.
- Test the System: After installation, test the switches to ensure they work correctly.
Common Mistakes to Avoid
When installing two way switch wiring, avoid these common mistakes:
- Incorrect Wiring: Follow the wiring diagram carefully to prevent incorrect connections.
- Loose Connections: Ensure all wire connections are tight and secure to prevent electrical faults.
- Ignoring Safety: Always turn off the power and use insulated tools to prevent electrical shocks.
- Skipping Testing: Test the switches and light fixture to confirm everything is working before finishing the installation.
Maintaining Your 2 Way Switch Wiring
Proper maintenance of your two way switch wiring ensures longevity and safety. Here’s how to keep your system in good condition:
- Regular Inspections: Periodically check the switches and wiring for signs of wear or damage.
- Clean Switches: Keep the switches clean and free from dust and dirt.
- Professional Checks: Have a qualified electrician inspect the wiring periodically to ensure everything is in good working order.
Troubleshooting Common Issues
If you encounter problems with your 2-way switch wiring, here are some common issues and solutions:
- Light Not Turning On/Off: Check for loose connections or faulty switches.
- Flickering Light: Inspect the wiring for any loose or damaged wires.
- Switch Not Working: Ensure the switches are correctly wired and test them with a voltage tester.
E Electrics: Your Partner in Electrical Solutions
At E Electrics, we understand the importance of safe and efficient electrical systems in your home or business. Our team of qualified electricians is experienced in all aspects of electrical work, including 2-way switch wiring. Whether you’re looking to install new switches, upgrade your existing system, or need troubleshooting assistance, we’re here to help.
Why Choose E Electrics?
- Expertise: Our electricians are fully trained and certified.
- Quality: We use only the best materials and follow industry standards.
- Safety: We prioritize safety in all our work, ensuring your electrical systems are secure.
- Customer Service: We pride ourselves on providing excellent customer service and support.
Contact E Electrics today to learn more about our services and how we can help you with your electrical needs. Your safety and satisfaction are our top priorities!
Conclusion
Understanding and implementing 2-way switch wiring can significantly improve your home’s lighting system’s convenience, safety, and efficiency. While it might initially seem complex, following the proper steps and using a clear wiring diagram can make the process manageable. When in doubt, you can always rely on the experts at E Electrics to provide professional assistance and ensure your electrical system is in top-notch condition.